
2019 Total Solar Eclipse Photo Gallery
I observed and photographed the total solar eclipse of July 2, 2019 from Mamalluca Observatory, Vicuna, Chile. Please see 2019 Eclipse Report for complete details about my experiences.
I set up my primary telescope (Vixen 90mm Fluorite Refractor) on the afternoon before the eclipse. Because it was still day time, I had to do a 'blind' polar alignment using a smart phone compass and inclinometer (for azimuth and altitude of the telescope's polar axis). On eclipse day, I finished set up of my 10 still and video cameras (including four Nikon DSLRs, two Panasonic video cameras, two Go Pros, and one 360 degree action camera), which took about four hours.
The gallery below contains a selection of images of this remarkable event that were captured with these cameras. Enjoy!
PS - You may also want to visit the 2019 Total Solar Eclipse Highlights Gallery featuring 12 of my best images of the 2019 eclipse.
Click on each thumbnail below to see a larger image and description.
2019 Total Solar Eclipse - Partial Phases and Totality
The following images capture the Partial Phases and Totality as shot (no processing).
They were shot with a Nikon D850 and a Vixen 90mm Fluorite Refractor (90mm, f/9, fl=810mm).
A Thousand Oaks glass filter was used for the Partial Phases.


Custom Prints Set 2: Partial Phases and Totality
2019 Total Solar Eclipse - Diamond Ring Effect
The following six images capture the Diamond Ring both before and after Totality.
They were shot with a Nikon D7200 and Sigma 170-500mm APO Aspherical Lens (at 500mm).


Custom Prints Set 3: Diamond Ring Effect
2019 Total Solar Eclipse - Diamond Ring and Baily's Beads
The following images capture the Diamond Ring and Baily's Beads both before and after Totality.
They were shot with a Nikon D850 and a Vixen 90mm Fluorite Refractor (90mm, f/9, fl=810mm).


Custom Prints Set 4: Diamond Ring and Baily's Bead
2019 Total Solar Eclipse - 2nd and 3rd Contact Sequences
The following images capture 2nd and 3rd Contact as Time Lapse Sequences.
They were shot with a Nikon D850 and a Vixen 90mm Fluorite Refractor (90mm, f/9, fl=810mm).


Custom Prints Set 5: 2nd and 3rd Contact Sequences
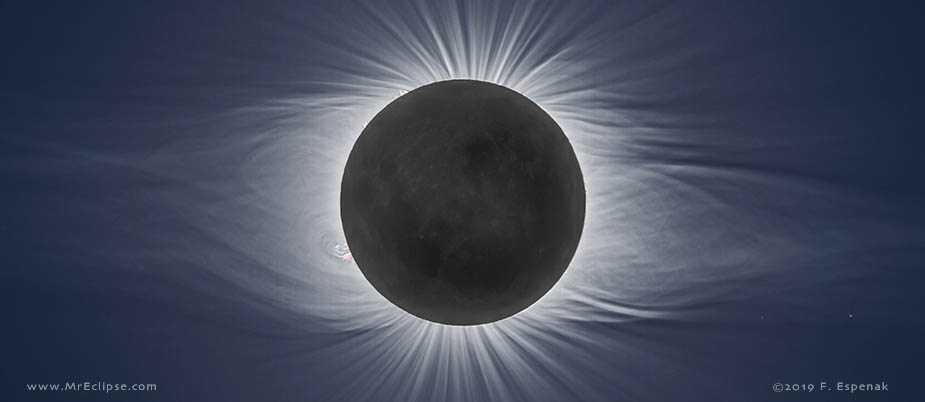
2019 Total Solar Eclipse - Solar Corona Composites
Below are HDR (High Dynamic Range) composites of the 2019 corona using four different levels processing aggressiveness. The lowest level (Visual) is subtle and most closely resembles the appearance of the corona to the naked eye or through binoculars. The other three levels (Detailed, Complex, and Morphological) are increasingly aggressive in order to reveal progressively more structure in the corona. The most aggressive level (Morphological) shows features that are virtually invisible to the eye (or very difficult to see).
Each of the four processing aggressiveness levels are displayed in three versions: 1) with a black sky, 2) with a more natural blue sky, and 3) a blue sky with earthshine on the Moon.
|
|
Black Sky |
Blue Sky |
Blue Sky &
|
Visual
|
|||
Detailed
|
|||
Complex
|
|||
Morphological
|


