Showing posts with label eggs. Show all posts

Tuesday, December 4, 2012

Forbidden Black Rice Egg Custard


SUPER GOOD...SUPER FOOD

rich with antioxidants, omega-3's and extra protein for great kick-start to all the busy holiday preparations.

forbidden rice ?...often eaten for breakfast in Asian countries.
egg custard ?...often eaten for dessert in the US.

put the two together and you have
dessert for breakfast.


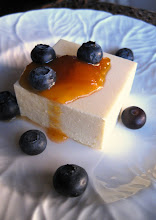
a delicious custard with slight hint of coconut and a nutty black rice texture.  it's healthy, filling and fun.  use real sugar if you're not into sugar substitutes.  you could even try coconut milk if you want to.  i'm not sure how it would set.  i chose to keep the custard American style.  check out the nutritional facts below...quite good for such a decadent looking healthy treat.

note...just got a report from my co-worker and trustworthy friend Nancy.  she LOVED it!
so, i guess it passed the test.  i'm not the only one...whew


FORBIDDEN BLACK RICE EGG CUSTARD

2 cups cooked forbidden black rice
4 eggs
1 cup non fat milk
1 cup 2% milk
1/2 cup low fat cottage cheese
1 1/3 scoop vanilla protein powder...i use Jay Robb Vanilla Whey
1/2 cup sugar or sugar substitute...i like Zsweet
1/4 tsp ginger
1 1/4 tsp cinnamon
3/4 tsp coconut extract
1 tsp vanilla bean paste

an immersion/stick blender is preferred, but a regular blender will work.
preheat oven to 350 F.
 and prepare a 2 qt. 8x8 glass or ceramic dish with non stick spray.
you will cook in a bain marie, so start a pot of water to boil and choose a vessel for your bain marie and put in the oven while preheating.

cook black rice and let come to room temperature, set aside.
 in a small bowl combine the dry ingredients, ie. the ginger, cinnamon, sugar sub. or real sugar and protein powder...set aside.
with an immersion blender, blend eggs, cottage cheese, 1 cup of milk.  blend until you can not see any cottage cheese bits.  add remaining cup of milk,coconut  extract and vanilla paste.
add dry to wet slowly so you don't get clumps or lumps.  blend and blend until thoroughly combined and smooth.
NOTE...i use an immersion/stick blender, but i think a normal blender will work  i don't think a stand mixer will do the job.

add the rice to the custard mixture and stir with a spoon or i gently used a hand whisk to separate the rice...it's a little sticky.
pour into prepared dish.  try to make sure the rice is even on the bottom.
bake in bain marie/water bath for 40-45 minutes.
NOTE...some rice custard recipes call for you to stir the mixture 1/2 way through the cooking to keep the rice from settling in one solid layer on the bottom...so i did just that...at 20 minutes i gently stirred.  i think it helped.
when custard looks just set, remove from oven and water bath and let come to room temp.
NOTE...this is a thicker custard because of the cottage cheese and protein powder so it should look set in the middle.

enjoy warm or refrigerate and enjoy throughout the week for a healthy breakfast or guilt-free treat anytime.


nutrition facts 
approx. for 9 servings (with sugar sub.)
calories...128
protein...11
carbs...13
fat...3

Thursday, September 6, 2012

Banh Gan. Vietnamese Flan...aka "Liver Cake"


DON'T ADJUST YOUR SCREEN...

YES...this is the color of Banh Gan.
translation..."LIVER CAKE"

NO...THERE IS NOT LIVER IN THE CAKE!

BUT...this has got to be one of the top 5 weirdest things i have ever baked.  make that top 3.
and as you know......i know some weird stuff.


i was introduced to this odd dessert one day when i took my mother on an adventure to Little Saigon here in Westminster, CA.  our goal was to go to 2 of the establishments where they make fresh tofu and serve their wares right on the spot...Tan Tan Tofu seemed to be the most popular on the Internet...closed on Wednesday.  on to  Dong Phuong Tofu just the next street over.  
sorry to say, but the experience was less than we had anticipated...we felt like aliens.  i'm used to feeling out of place because i go to some out of the ordinary places, but the employees (probably the owners) didn't really want to help us AT ALL.  knowing that i was out of my element i was as nice as nice could be, but to no avail.  even my little mother felt uncomfortable.  we muddled our way through the language barrier, with no help from the guy behind the counter...bought a few pieces of fried tofu...good, but not great and didn't see any of the fresh tofu i was hoping for...at that point i didn't dare ask.
BUT at the register there was this odd flat squishy brownish looking dessert.
i saw the word "flan" and threw it in with our small purchase.


when we got home i had to check this "flan" out...
to be honest...first bite?...ewe!  this is NOT the flan i was used to.  way too sweet, gummy, odd texture and a waste of money, might have to throw it out...
second day?...second bite...hmmm, not too bad.  it would be wasteful to throw out...i'll keep it.
third day?...hey, i think i like this.  WHAT THE HECK IS IT?  i liked it so much i ripped off the label and googled Bahn Gan to see what exactly i was eating.  maybe i could find the recipe.


i only found 2...two recipes that really resembled the strange brown spongy liver looking block that i had become fascinated with.
most of the recipes out there looked like regular flan or creme caramel.  as you can see this is not your basic flan...as a matter of fact, it barely resembles a flan.  maybe a well cooked "WOOPS, I OVER COOKED THE FLAN" type of flan.

i wish i could explain exactly how weird this was to cook, but i will
cut to the chase...
this post is getting too long.  i could go on and on.
in short...i have already cooked this dessert 3 times and have more to report with a different recipe involving espresso and chocolate that is equally as good as this one.  i will post about banh gan #2 and #3 later.

if you want to try something out of the ordinary and totally weird, BUT DELICIOUS...
whip one of these up.  i have had quite a bit of fun asking friends to try it.  when i explain there is no liver involved at all, only then are they willing to give it a try.
i've already been asked for the recipe twice.

BANH GAN #4 is in the works...

by the way...what's the weirdest dessert you've ever come across ?...
  

BANH GAN...VIETNAMESE FLAN
very slightly adapted from QlinArt

7 large eggs
1 cup good quality coconut milk
2/3 cup dark brown sugar or raw cane sugar
1/4 tsp each...powdered cinnamon, anise, cloves.
i did not have powdered anise so i steeped 3 star anise in the coconut?sugar mixture.
1 tsp ginger juice (use garlic press)
1 tsp baking soda

preheat oven to 350 F degrees
grease a 8"x 3"x 4" loaf pan.  i used a glass pyrex because that's what i though would be good for a custard.  ALSO, i wanted to see what it was looking like from top to bottom.

melt sugar in coconut milk over medium high heat in  a medium sauce pan and boil or simmer for about 15 minutes.
add spices, ginger juice and baking soda.  whip with whisk for about 1 minute...it will foam up a bit.
remove mixture from heat and let stand for 5 minutes.
add slightly beaten eggs in a slow steady stream and beat the mixture until smooth with a whisk.
pour batter through a strainer into a preheated greased loaf pan

bake uncovered for 30-40 minutes in regular oven.
i think mine was in for 45 minutes.  i kept a close eye on it...not knowing what it was supposed to look like, i waited until the center looked like it had risen enough and i knew the eggs were cooked through. 
BY THE WAY...it was soooo odd looking while it cooked...something out of Alien.  it looked like it was alive all bubbling underneath it's thin brown crust.  i've never seen anything like it.

remove from oven and let the cake stand for at least 15 minutes for it to cool before removing from pan.
as the cake cools it will deflate considerably.  don't be alarmed.  it will condense into a firm custard.

chill in the refrigerator for at least 2 hours.
another BY THE WAY...right out of the oven this thing smelled like rotten eggs...sulfur in fact.  i thought, what the heck is this?...how can this be edible?  i put it in the fridge for a few hours and gave it a try...ewe, still rotten eggs.  yikes.  i was going to throw it out, but knew i needed to blog about it.  i let it sit in the fridge while i thought about it.   a day or two later i brought it out again...after messing around for about an hour taking pictures i realized the smell had gone away.  miraculously the smell had disappeared.

again...cut to the chase....
after it is cooked, put it in the fridge for at least a day or two.  then bring it out and give it a try.  maybe it will need some airing out as well.
i know this doesn't sound all that tempting to a lot of you out there, but it sure makes for great conversation.  if you take the chance and make it, i hope you will be pleasantly surprised like i was...
i'm still fascinated.


Monday, July 23, 2012

Cherry Clafoutis


cherries...cherries...cherries

i have to make use of those beautiful cherries.


cherry clafoutis is a great easy way to get those cherries in use.  the recipe calls for 1 pound, but i ate too many right out of the bag so i only had about 1/2 pound...no worries, i cut them in half to cover the dish.  this treat whips up in a flash and bakes for about 45 minutes so give yourself about an hour and you'll have something delicious for Sunday brunch or a light dessert. if you have any left over it keeps well in the fridge and is quite tasty the next day...beyond a day or two it gets a bit weepy, still edible, but i doubt you'll have it for that long.
i've included the nutritional facts and as you can see it's pretty healthy and low carb and no sugar if you use the Z Sweet like i do.  check the link if you have questions about this sugar substitute.  i used to use Splenda, but this is far far better.  it acts more like real sugar with no after taste that i am aware of.


please pardon the photo above.   as a whole,  it's rather plain looking...not a spectacular showing, but if you dress the servings up a bit like the first photo or a little powdered sugar and a few stray cherries...then you have a nice presentation.  i served mine with a little vanilla greek yogurt and some Homemade Cherry Chipotle Preserves...delish.  i'll post about the preserves very soon.
oh, by the way...if you don't have a cherry pitter by now, i suggest you go out and get one.  i have the one by OXO.
i know a true Clafoutis has the whole cherry, pit and all, but who wants to deal with running into a pit when eating something custardy and delicious?


CHERRY CLAFOUTIS

1/4 cup sugar or sugar substitute...like Z Sweet (Erythritol)
1/4 tsp salt
1/4 cup AP flour
3 large eggs
1 cup milk
1 1/2 tsp vanilla...
OR...1 tsp vanilla and 1/2 tsp of almond extract is nice as well
1 lb pitted cherries...i only had about 1/2 lb.  shown here... pitted and halved

preheat oven to 375 F degrees
butter a 9" pie plate
whisk together flour, sugar and salt
whisk in eggs, one at a time
whisk in milk and vanilla until incorporated.
arrange cherries in buttered pie dish.  pour batter over the cherries.
bake for about 45 minutes or until clafouti is puffed, lightly browned and middle looks set.
allow to cool a bit before serving.  sift powdered sugar over the top.

serve as is or with whipped cream for a dessert or vanilla greek yogurt for a delicious breakfast


NUTRITION FACTS...approx.
6 servings using Z Sweet, sugar substitute...whole milk and real eggs are necessary.

plain clafoutis
cals...92
carbs...9
fat...3.6
protein...5.1


Tuesday, July 17, 2012

Healthy Breakfast Bread Custard


healthy, warm, filling...creamy, sweet, delicious.
protein, calcium and fiber that tastes like 
dessert for breakfast...
or is it breakfast for dessert?...

you can serve this as a guilt-free dessert on a sunday evening.
then..reheat for a quick healthy breakfast treat throughout the week with vanilla greek yogurt and fresh berries.


straight out of the oven, it's soft and custardy. add a few extra mini chips or shave some dark chocolate on before serving to make it look like more of a dessert.  on it's own it's fabulous, but you could  dress it up a bit... top with lite whipped cream, a slight drizzle of chocolate syrup or sugar free maple syrup...add some toasted almonds or pecans for a little texture?...fresh berries and some creme anglais...?


it's also great the next day, slightly warmed  or even right out of the fridge.  for a "get-up-and-go" breakfast i like to cut it into squares and layer it with yogurt and berries... drizzle with a little maple syrup in your favorite sturdy glass and your out the door in minutes with a satisfying meal to start your day.


HEALTHY BREAKFAST BREAD CUSTARD

8 - 10 slices whole wheat bread cut in 1 inch cubes (stale or slightly toasted)
i used Weight Watchers (45 cal.slice)
after the crust was cut off it weighed the same as 8 slices
1 cup whole milk
1 cup non fat milk
4 large eggs, slightly beaten
1 tsp vanilla extract
1/4 tsp maple extract
1/3 cup granulated Z Sweet, Erythritol or another sugar substitute
1/2 scoop vanilla whey protein powder, optional
i like to use Jay Robb Vanilla Whey Powder
1 tsp cinnamon 
1/4 tsp ground ginger
a dash of cardamom...or more if you like, optional
a few grates of fresh nutmeg
14 grams mini chocolate chips
more chips if you like but i wanted to keep it healthier

preheat oven to 350 F degrees
this cooks in a bain marie (water bath) so heat some water on the stove and put a larger baking dish in the oven to prepare for the bain marie.
dry out your bread on a rack for a few minutes while preheating...not toasted, just a little dried.  then cube bread in approximate 1 inch squares...set aside.
in a large bowl whisk eggs and extracts...then add milks and whisk...just blend, not foamy.
in a small bowl whisk together the dry...protein powder, cinnamon, ginger, nutmeg, cardamom and sugar substitute.  this will prevent potein powder and spices from clumping.
slowly whisk dry into wet.  incorporate well.
add bread cubes and fold or gently stir so that everything is coated and cubes are absorbing liquid...let sit for a few minutes and stir again...soaking is good if you have the time.

spray an 8 inch baking dish and pour mixture in...evenly distribute cubes in dish.
sprinkle mini chips evenly and poke a few down in mixture.  you'll be surprised how much that measly 14 grams of chips will cover.
bake for 35 - 40 minutes in the bain marie or until a knife is inserted and comes out clean with no moisture or leakage at the cut.

approx. NUTRITIONAL FACTS
for 8 servings

122 cals
13.5 carbs
10.5 protein
4.5 fats
3.2 fiber
3.6 sugars

Saturday, April 28, 2012

Chorizo Tortilla Egg Bake ...with a little less guilt


hi folks...it's almost Cinco de Mayo...
so dust off your sombrero and shake out that dusty old poncho...

Chorizo Tortilla Egg Bake is a perfect way to start the day...AND if you're watching your carbs and calories due to the swimsuit season fast approaching...not to worry.
believe it or not...this version is low carb, high protein and not as much fat as you might think. 
 chorizo can be quite fatty, but cooked down and given a little tender care it can be a big flavor punch without all the grease and fat.  
tortillas ARE really full of carbs, but if you just use a couple you'll be surprised at how much delicious corn masa flavor will carry through the whole dish.
eggs...full of good stuff, but cut the real eggs with some egg beaters and you'll never know the difference in an egg bake...i guarantee.

give this a try for a fun Mexican brunch.  the dish keeps very well and reheats in the microwave for a perfect on the go spicy breakfast or snack.  oh...and it freezes well too.

approximate NUTRITION
for 9 servings
cals...170
carbs...7
fat...8
protein 16


CHORIZO TORTILLA EGG BAKE
basic concept from Kalyn's Kitchen Egg Casserole

1/2 white onion, diced
1 1/2 jalapeno, diced , seeded and de-veined
(you can substitute jalapeno with canned diced green chiles)
1 Tbsp olive oil
4 large eggs, slightly beaten
2 large egg whites
1 cup egg beaters or substitute
4 oz fat free sharp cheddar cheese, grated
8 oz chorizo
1 cup cottage cheese, rinsed in a strainer and patted dry
2 1/2 corn tortillas, cut in to 1/2 inch long strips
1/2 tsp ground cumin
1/4 tsp ground coriander
a good pinch of cayenne if you can handle the heat
salt and pepper
a handful of fresh cilantro, chopped
NOTE...seasonings depend on how flavorful your chorizo is.
use more or less to your liking.

preheat oven to 375F degrees
spray a 2 quart, 8 x 8 or 7 x 11 baking dish with non stick spray or olive oil.
saute the onion and jalapeno, in as little oil as possible.
add chorizo and cook 'til done.
transfer to a paper towel lined bowl or dish and let the fats absorb in the towels.  change paper towel if necessary.
layer the bottom of your chosen cooking dish with 1/2 of the tortilla strips...evenly spread out.
now start layering 1/2 the chorizo onion mixture, 1/2 cheese and 1/2 cottage cheese curds, a little cilantro.
sprinkle 1/2 of your ground spices...and a little salt and pepper.... and then start again with the rest of the tortilla strips, chorizo, cheese, cottage cheese and cilantro.
sprinkle other half of ground spices...and a little salt and pepper
NOTE...watch your salt additions due to the chorizo, grated cheese and cottage cheese all have salt in them.
ANOTHER NOTE...not exact instructions, but you get the idea...you want a little of everything in each and every bite.  the remaining tortilla strips should be evenly distributed for maximum masa flavor.

in a bowl mix all the eggs and beaters until combined (not frothy).
pour eggs over layered ingredients.
gently use a fork to make sure egg mixture is well incorporated.
grate a little extra cheese over the top.
NOTE...if it doesn't look like the egg mixture is enough,  just beat up another and add it in.  i get carried away with my additions and often need to add another egg and an egg white.

bake until eggs are firmly set and top is lightly browned
20 - 25 minutes for an 8 x 8 dish
NOTE...mine might have taken a bit longer so keep an eye after 20 minutes.
the middle should rise a little and you will know it is cooked trough.
AND sometimes i need to tent with foil if getting too brown.

serve with some fresh pico de gallo, sliced avocado and a dollop of low fat sour cream
OR...just eat as is...reheat a square for a good breakfast though the week.
LAST NOTE...pretty darn good at room temperature while driving the car in a mad dash to work.
(i tested the freezing and thawing...it came out great.)


Sunday, April 15, 2012

Chawanmushi. Japanese Steamed Egg Custard


Chawanmushi might sound exotic and look complex, but it's so simple to make.
it's really just a delicate egg custard filled with delicious little savory nuggets.
i'll be the first to admit that i DO NOT know Asian cooking techniques and terms as well as i would like to, so bear with me.  if you happen to be Asian or just know more about Asian cuisine...by all means drop me a note.  

BUT...for now i will keep it simple.

as i understand a classic Chawanmushi is egg mixed with dashi, a touch of soy, a splash of mirin...then poured over a few ingredients like diced chicken, shrimp, ginko nuts...and steamed to a delicious silky egg custard.
typically served as an appetizer, this dish can be transformed with just about anything you want to put into it...add udon noodles and you've got a main dish called Odamaki Mushi.
i've made this quite a few times...for a light dinner i added diced roasted chicken and sauteed crimini mushrooms in the custard and topped it with carrot, chive and a slice of octopus sashimi (shown in white bowl).   for a simple version (blue bowl) i added a few mushrooms i had already sauteed from the fridge...done...so simple...so delicious.  


NOTE...don't be scared off by the classic ingredients DASHI,  Mirin, Ginko Nuts...

this can also be made with good ol' chicken broth.
turns out this is an absolute "feel better" comfort food for any nationality.

BUT...i must say...making your own Dashi is too easy.  once you make it, you will recognize that distinct flavor.  Japanese cuisine uses it as a background stock in a lot of cooking. you'll find the Konbu Seaweed and the Bonita Flakes at most health food stores.  i really suggest going out and finding an Asian market near you.  they are a lot of fun with all kinds of goodies you've never seen.  i go just about every weekend and always find something new.  if you're in So. California, look for 99 Ranch Market...it's like a big Asian Ralph's.  they will have whatever you are looking for...and MORE.


CHAWANMUSHI
check link for other's comments and original recipe

2 large eggs
3/4 cup dashi (see below) or broth of choice
NOTE...some recipes call for more broth.  i like this amount of broth, but you can experiment with the ratio of eggs to broth.
1 dash mirin or sake
1/2 tsp soy
1/2 cup cooked diced chicken
chives
shredded carrots
a few Ginko nuts if you can get them
just a few sauteed crimini or shitaki mushrooms, diced or left sliced for topping.
your choice for more toppings.

set up a steamer that your bowls of choice will fit in.  start the steamer...you will want it hot and ready to steam when filled bowls go in.
in a medium bowl, whisk eggs gently with broth, mirin and soy.  divide diced chicken and diced mushroom into 2 - 3 small bowls.  pour egg mixture through strainer into bowls, slowly as to not disturb the diced items.  you don't want to have them floating about.
cover each bowl.  i used double saran wrap a few times and it works well.  just take care removing wrap when done so as not get condensation into finished chawanmushi

set covered bowls into flat surface steamer (steamer that is good and ready).
cover steamer and turn heat to a simmer.  
steam for 12-15 minutes (depending on size of bowls) or until egg is set...firm, but soft like silken tofu.

top with chives, green onion, shrimp, seared scallop. mushrooms, etc.....

DASHI
2 1/2 cups water
1 square dried konbu (kelp)
15g dried bonito flakes
1/4 tsp salt
1/2 tsp soy

briefly rinse konbu, put in sauce pan with water and bring to a boil over medium heat.  just before boil, remove from heat and add bonito flakes and soy.
let this steep and come to room temp...strain

NOTES...i added a heaping Tbsp of fresh diced ginger  when i added the bonito.  then strain.

store in the fridge as you would a simple stock.  i think it would freeze well so you can have some ready for chawanmushi on the fly.

you never know...this could be your new comfort food.

(woops...custard with chopsticks?...quite often my head is not using the right utensil)

Sunday, April 1, 2012

CAVIAR and EGGS IN A PERFECT EGG SHELL CUP


creamy eggs topped with Russian caviar tucked into a perfect little egg cup...
one of my all time favorite savory treats.  
so simple, so delicious, so delicate and SOOOO EASY !...

if you have the right tool !

i spotted this little uni-tasker egg gadget about 6 years ago, but i couldn't justify paying the whopping $55.00 for something that does one thing.  well, now that Rosle is making one and it only costs $20.00 bucks...i finally snatched one up.  now I can make the fancy looking froo froo caviar egg cup that i fell in love with years ago at L'Orangerie Restaurant.  piled high with caviar... my eyes would light up as it was brought to the table by the waiter wearing white gloves.  although it's doors are closed now, i'll never forget the wonderful dinners i had there and ordering this decadent first course every time.   
i missed my delicious little caviar egg cup...until now.


the Rosle Egg Topper...a must buy.  as far as gadgets go?  this one is worth it.  it does it's job and it does it well.  i purchased mine at Sur la Table, but i'm sure you can get one on line HERE or at the Sur la Table website...HERE.


this post isn't so much about the recipe, i'm sure you can all figure it out, but here is how i make caviar eggs.  these are not your every day scrambled eggs...they have way to much cream and butter, but they work well for the presentation in the shell and the rich creamy eggs compliment the savory dollop of caviar.


RECIPE FOR CREAMY EGGS
(if you want concrete Martha Stewart instructions click HERE, but this is how i roll...pretty much the same idea.)
first...top your eggs with your new topper...snap the topper once on the egg, then when you see a slight crack carefully slip a thin knife in and ever so carefully pry the top off.  you'll get the hang of it quickly.
remove egg from shell and clean inside well.  carefully dunk them into a pot of boiling water for a min or two to remove any impurities and set them upside down to dry while cooking eggs.
you'll need...about 1 per egg cup
heavy cream
butter
salt, but remember the caviar is salty
pepper (white is best)
chives
 and your choice of topping
and toast, of course.

if filling egg cups you'll need to add one or two more eggs than you need.  the pan and the pastry bag will catch a bit...besides you might have an accident with one of your shells.
use about 1/2 Tbsp heavy cream per egg (might need a little more.  i don't measure)
dash salt and pepper
whisk well, but not fluffy
start your pan on low and add a healthy (more than usual) pat of butter to coat.
add the eggs and let them get started...these need to be cooked low and slow, stirring all along to prevent large curds from forming.
the key is to take them off the heat before you think they are done.  you can always cook them more, but you can't undo something that has been over cooked.
use your judgement...remember these need to be soft enough to go into a piping bag, but firm enough to hold shape and support your topping.

fill a pastry bag with eggs and start to assemble.  caviar isn't necessary, but it sure elevates the dish to something special.  small diced smoked salmon with a dollop of creme fraiche is delicious as well.
the toast?...i think the best way is to saute with butter in a pan...for some reason it tastes better than out of the toaster.

Tuesday, June 7, 2011

Creme Brulee...Guilt-free version


yup...another "guilt-free" dessert...

sorry, but i live in Southern California and i know at some point in the next few months i AM going to to be in public wearing  a bikini...scary thought...so i'm dishing up all these sweet treats that won't kill the waistline.
not to worry...i'll still throw a few REAL GOODIES in the mix.   one can only go so far with splenda and egg substitute.  chocolate is calling my name...
and bacon hasn't left the game


these are pictures of the custards straight out of the oven...
i must say they DO resemble an egg custard rather than a "true creme" that would naturally be rich and creamy, but this will surely trick the eyes and the palate with a crunchy crispy brulee'd topping.

quick note...i just had one of these that was left in the fridge.  plain with no sugar topping, no brulee treatment...it was fabulous.  better than an egg custard.  it DID actually have that creme brulee taste.  i made the custards 2 nights ago and it was even better tonight than the first night i served them.  i bet the vanilla bean had something to do with it.  so don't leave the fresh bean out...AND might i suggest making them the day before.  let them sit in the fridge over night...yummm!
definite winner...i'll make these again and again.  i think these would make a fabulous ending to a savory Sunday brunch.   if i had time in the morning i'd torch one up for breakfast.


HEALTHY CREME BRULEE
 original with nutrition values linked above.

2 cups non fat milk
2 Tbsp n on fat powdered milk
1/2 cup egg substitute
1 whole large egg, slightly beaten
1/3 cup baking splenda or sugar substitute...not quite 1/3 cup is sweet enough
1 tsp vanilla extract
1/2 real vanilla bean, scraped
sugar for brulee

preheat oven to 325 F degrees
NOTE...i did mine in a convection oven at 310 F... i think the forced air affected the surface.  i will use a regular oven next time to get a smoother more uniform looking top.

lightly whisk milk powder into milk.  lightly whisk egg and egg substitute until combined.  add eggs to milk mixture with the splenda and vanilla extract and bean scrapings....TIP---in a little bowl, mix the vanilla bean scrapings with a couple of tablespoons of the mixture so that it will not clump together.  when the bean specks look like they have separated pour this back into the whole mixture.  (i learned this after i had to deal with vanilla bean clumps.)  
whisk until combined, but do not whisk hard...you don't want a lot of foam or bubbles.
pour mixture into custard cups
NOTE...this made a little more than 4  7oz. custard cups...do not over fill.  i did not use it all.
bake the custards in a bain marie...make sure you fill your bain marie with very hot hot water...but not boiling water.
bake for 35 minutes or until knife inserted comes out clean and they look set...might appear slightly jiggly in the center
let them cool then move to the fridge...uncovered for a couple hours...
or as i mentioned above, leave them in over night.  after they have fully chilled (an hour of so) cover them with plastic wrap.  press the plastic wrap right down onto the custard (like you would a pudding).

when ready to serve remove from fridge and dab off any moisture that might have collected on the top. let them come to room temp....if you can wait.
sprinkle with at least 1 - 2 tsp of sugar...i did not skimp on this part.  you want a good hard top to crack through
FLAME ON !!!   torch your sugar
if you do not have a torch i suggest you purchase one...it's much more FUN and satisfying than trying to get the "brulee effect"  in the broiler.
don't forget to let cool off a little before handling.


Friday, April 29, 2011

Egg Casserole with Ham, Cheese and Spinach


wonder what to do with that last bit of Easter Ham?
your family has probably just about had it with ham sandwiches...
use those last few slices in an egg casserole....make these cute little appetizer or snack bites, serve as a whole for a fabulous brunch or reheat for an on-the-go breakfast or lunch


on  a side note...i have to throw in a picture of my HAM...MAPLE BROWN SUGAR GINGER GLAZED HAM.  this was my 1st HAM.  i am so proud of my HAM.  i don't think anyone else truly appreciated MY HAM as i did.  we usually spend $50.00 - $60.00 for a dependable Honey Baked Ham, but the store closed here in Newport Beach.  so sad.  i look forward to a nice big ham every year.  once a year i am engulfed in ham glory.  no one else really cared.  no one else is in love with ham...so this year i went for it and decided to do my own ham...guess what?


IT WAS THE BEST DARN HAM WE EVER HAD !!!
AND IT COST $9.53 !!!


well, i'm not wasting a morsel of this ham.
as a matter of fact...i am the only one left eating the ham...so i've been finding ways to use up the rest of the 11.5 pounder that i made.


this egg bake recipe is so versatile and easy i think you'll enjoy it as much as i do.  it's perfect for the left-over ham or any other meat veggie combo.  a few weeks ago i used up a roast chicken from Cost-co and turned it into a Mexican Egg Casserole...delicious with fresh salsa.  i love to have a substantial breakfast or lunch that i can easily rewarm or eat on the fly and this fits the bill.  it's great right out of the oven for the whole family or reheated for a quick on-the-go breakfast or lunch.


as shown in the photos, it's also a great idea for hors d'oeuvres.  make this the day before, cut them up in little squares and decorate them with something cute like these perky little grape tomatoes.  set out at room temp with a side of dijon mustard and your set..no fuss and i bet you'll get raves.

i should also mention this is pretty healthy.  depending on the ingredients you add to the basic recipe, this can be fairly low in carbs, fat and calories.  i made mine with 1/2 eggbeaters and half real eggs...there's no heavy cream or milk and can be made with low fat cheeses.  i think the surprise ingredient is washed and drained cottage cheese.  sounds weird, but it works.


EGG CASSEROLE with HAM CHEESE and SPINACH
adapted from Kalyn's Breakfast Casserole at Kalyn's Kitchen

please check the link for the original recipe and Kalyn breaks down the quantities for small, medium, large casserole dishes.  the whole web site is great for healthy diet alternatives.

below is the recipe for what you see in the photo, but many variations are possible

5 large eggs
5 eggs substitute equivalent
1 tsp salt (watch your salt because the cheese and ham is salted)
1/4 cup small chopped chives
1 - 1 1/2 cup ham...diced or baton cut (julienned)
2/3 cup low fat grated Mexican cheddar blend
1/3 cup grated good, real Monterrey Jack
4 oz. cottage cheese, rinsed so whole curds remain and pat off water with paper towel
1 pkg frozen spinach.  drained and squeezed very well.
2 -3 Tbsp canned diced jalapeno

preheat your oven to 375 F degrees and spray a 7 x 11 glass pyrex dish.
thaw, drain and squeeze your frozen spinach.  cut your meat and grate your cheese.
in the bottom of your casserole dish layer the meat, cheese, 1/2 of the chives.  add the squeezed spinach.  you'll have to pull it apart in small clumps to evenly distribute.
in a bowl mix your eggs until well combined, but not over beaten.  add the cottage cheese curds to the eggs and season as you would scrambled eggs.
pour this mixture over the meat and cheese in the dish and gently stir or prod with a fork so that all the ingredients are evenly distributed in the eggs.  sprinkle with a little more Monterrey Jack and chives

bake for 20-25 minutes or until middle looks set.  it's okay if the sides get a little golden brown.  you'll notice the middle puff up a little.

let set a little before serving or cool completely and refrigerate.


Tuesday, April 19, 2011

Finally, The Successful Souffle


ahhhh....now this is what i'm talkin' about.

HOUSTON, WE HAVE LIFT OFF...

A DELICIOUSLY SIMPLE CHEESE SOUFFLE...


well, i can cross this off my "Bucket List"

success with the "CLASSIC CHEESE SOUFFLE"
light, soft, airy, smooth, dissolve in the mouth cheesy egg goodness.  like a little cloud of heaven has finally arrived on the plate.

if you're interested in making a savory souffle and it's your first attempt, i suggest you try this recipe by Alton Brown...really, no kidding.  who would have thought Alton Brown vs our beloved Julia Child in a recipe match?...i choose Alton?...yikes!  well that's just crazy talk...but true for this novice souffle cook.

as you might already know this is not my first attempt at "The Elegant Souffle".  i posted about my failure with Julia Child's Souffle a few days ago.  i was so dismayed and upset with my failure that it took a while for me to try again.  i was up late one night and caught an Alton Brown rerun...he seemed to demystify "The Souffle".  in this episode he just showed the basics of souffle making...nothing crazy, no contraptions, just straight up souffle talk.  i had to try again...even though it was an Alton Brown recipe.  not to diss Alton by any means, but he does get carried away sometimes with his complex instructions and odd contraptions.


photo above is right out of the oven...
the other photos of the full souffle were taken anywhere from 5 minutes to an hour after taking it out.  it held up VERY well.
the little photo below of the single serving is the only picture i could get before i finally HAD to dig in.    sorry it's not the beauty shot i had hoped for, but you can see how well it held up on the plate.  i was just so excited that it turned out...so fabulous, light and fluffy all on it's own.  i think it would also be delicious with a sauce of some sort.  can't wait to try it again and give it some more thought.


NOTE to first time souffle cooks....have everything ready.
get your mise en place in place!
be ready with all the separate bowls and utensils...that said, be ready for a big mess, or just a lot of dirty bowls and such.  i'm sure the second time around it won't be so bad, but it's all worth the trouble...

trust me, a successful souffle can make your day !


CHEESE SOUFFLE
recipe from Alton Brown...no adaptations
i have copied the recipe exactly for your convenience, but please check link for printable recipe, others comments, ratings and reviews.

ingredients
butter, room temperature, for greasing souffle dish
2 Tbsp FINE grated Parmesan
1 1/2 oz. butter...3 Tbsp
3 Tbsp flour
1 tsp dry mustard
1/2 tsp garlic powder
1/8 tsp kosher salt
1 1/3 cups milk, hot
4 large egg yolks
6 oz sharp cheddar cheese
5 egg whites plus 1 Tbsp water
1/2 tsp cream of tartar

directions
use room temp. butter to grease an 8 inch souffle mold.  add the grated Parmesan and roll around the mold to cover the sides.  cover with plastic wrap and place in the freezer for 5 minutes.
preheat oven to 375 F
in a small sauce pan, heat the butter.  allow the water to cook out.
in a separate bowl combine the flour, dry mustard, garlic powder, and kosher salt.  whisk the mixture into the melted butter.  cook for 2 minutes
whisk in the hot milk and turn the heat to high.  once the mixture reaches a boil, remove from heat.
in a separate bowl, beat the egg yolks to a creamy consistency.  temper the yolks into the milk mixture, constantly whisking.  remove from the heat and add the cheese.  whisk until well incorporated.
in a separate bowl, using a hand mixer, whip the egg whites and cream of tartar until glossy and firm.  add 1/4 of the mixture to the base.  continue to add the whites by thirds, folding VERY gently.
pour the mixture into the souffle dish.  fill the souffle 1/2 inch from the top.  place on an aluminum pie pan.  bake in the oven for 35 minutes.  do not open the oven during cooking...you don't want any of the heat to escape...even cooking temp. is important.

serve immediately...or at least call everyone or ANYone into the kitchen to marvel at your success.


Related Posts Plugin for WordPress, Blogger...