Showing posts with label tag. Show all posts

Wednesday 7 November 2018

#lovely Plum Crazy Tag


Re-edited: I am absolutely thrilled to say that my tag has been chosen as one of the winners of the Dusty Attic's November Moodboard challenge!!! Yay!!  :)

Hello my lovelies,

I hope you're managing to keep away from the wind and autumnal chill and are crafting away something fabulous instead :).

I'd like to share a little tag I created, having a deep plum v autumnal vibe in mind.

I don't get much time (or mojo, sadly...) to craft these days but I was totally bowled over with the Dusty Attic's November moodboard inspiration photo. I love all things purple and the yummy plums on the collage got my creative juices going. Oh, and what about that yummy looking cake with the beautiful leafy crust? So 'Thank you' Dusty Attic for such a delicious inspiration to get me crafting again! Yay! :)

I just couldn't resist it, so I thought I would try to create something for their November challenge. The DT are actually all playing with notebooks this month but that wasn't where my creative muse was taking me, sorry! And since she's a very capricious lady I had to follow the path she was leading me on lol :).


The patterned paper base of my tag includes some stamping and  'double (or triple even?) embossing'. First, I debossed the tag with a Cuttlebug embossing folder and then I embossed the impressed image with Garnet Grenat embossing powder. Then I added some stamping with the Brush Stroke stamp and embossed it with Rose Gold powder.

I also decided to paint some artificial leaves with DecoArt paints to wrap my bouquet of 'harvested' flowers, berries, foliage and frilly grasses.


The flowers and the tag were tinted with Merlot spray ink and I generously sprinkled my harvest bouquet with Mini Prills and Twinklets Diamond Dust. I also added a #lovely chippy from the Dusty Attic Hashtag Sayings #2 set. I heat embossed it with Honey Miel and Rose Gold powders.


Main supplies:
Stampendous: Brush Strokes stamp, embossing powders in Honey Miel, Rose Gold, PEARLustre Garnet Grenat
Scrapbook Adhesives by 3L: 3D Foam Squares - Black, Dual Tip Glue Pen, Extreme Double-sided Tape
Dusty Attic - Hashtag Sayings #2
DecoArt: Metallic Lustre - Champagne Ice, Americana acrylics in Country Red, Royal Fuchsia, Dioxazine Purple, Bittersweet Chocolate, Snow White
Distress Inks: Seedless Preserves, Dusty Concord, Aged  Mahogany, Forest Moss, Black Soot
Memories Most - Merlot


I might have gone a bit crazy with my embellies but hey, who was I to argue with my creative muse if that's what she craved?! lol :)

That's all from me for now, my Friends! Thank you for stopping by and for any lovely comments you may wish to leave to let me know you've been!

Have a very creative week!

Big crafty hugs

Asia King Blog signature_small

Follow on Bloglovin
♥ Follow Me On Bloglovin'

I'm also entering the following challenges:
Frilly and Funkie - A Harvest of Gratitude challenge
Simon Says Stamp Wednesday Challenge - Thanks/Thanksgiving
Rhedd's Creative Spirit - Anything Goes
A Vintage Journey - Paper Stash
Read More

Thursday 14 January 2016

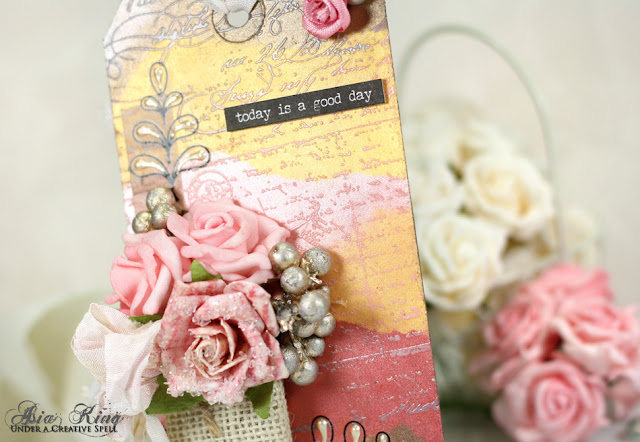
Today Is A Good Day

Hello my lovelies! Warmest welcome to all my new and regular readers! :)

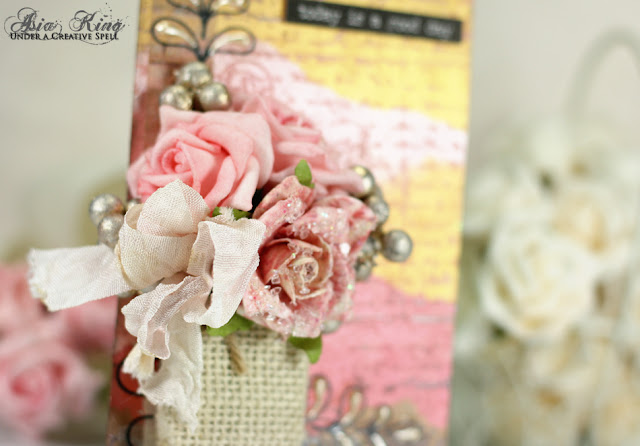
Today over at Scrapbook Adhesives by 3L I am sharing this shimmery art tag and you can see my post here. I created a DIY background using gorgeous Pigment Powders - but to find out more, please hop over to the Scrapbook Adhesives by 3L's blog!

Shabby chic vintage tag with flowers

Supplies:

Donna Salazar with Scrapbook Adhesives by 3L® Pigment Powders - Gold, Pink, Brown, Wine (coming soon!) and Silver (coming soon!); Lace Ribbons; Ash Washi Tape (coming soon!)

Adhesive Sheets 4x6", DODZ™ - Small, DODZ™ - 3D, DODZ™ - XL, Thin 3D Foam Squares - Mix Black

hand died seam binding ribbon

Other supplies:

Stampendous: Cling Vintage Letter stamp, Clear Detail Embossing Powder
Donna Salazar Designs MIX'D MEDIA INX - Chiffon
Liquid Pearls, flowers, ornamental berries, manila tag, seam binding ribbon

have a good day!

I really like this colour combo for Spring time projects and the Pigment Powders worked perfectly for me - just like in this Spring Time Art card.

And I just looooove these little Styrofoam berries, they are so cute, don't you think? I bought them in the 'after Christmas sales' a year ago for 50p - a real bargain and I still have loads of them left! I've also used them in this Bird's Nest Artist Trading Block project if you'd like to have another peek. 

Art tag with DIY Pigment Powders background

I hope you like my first project of the new year! Thank you so much for stopping by today and for your lovely comments!

Big crafty hugs

Asia King Blog signature_small

Follow on Bloglovin
♥ Follow Me On Bloglovin'
Read More

Thursday 2 October 2014

Owl Be Watching Over You


Hello Friends! How are you today? 

I am very, very happy today - especially after seeing new followers who so kindly chose to hang around my blog :-). Thank you so much!

With the nights drawing in earlier and earlier and smoky scents floating in the air one can't help but start thinking of...Halloween!

Although we don't really make any Halloween preparations at home, there is something really mesmerising about this event and I am always fascinated by all the creatively ghoulish and scary-licious projects shared in the blogland.

And in the spirit (or ghost??? lol) of this event, here is my offering for you today.

And while I'm on the subject of ghoulish makes. Stampendous October 2014 Blog Challenge is now open and the theme is Halloween Haunt. Be sure to link all your beautifully scary creations to the challenge linky tool and you may also have a chance to win some delicious Stampendoulicious treats!


For my Halloween tag I used Distress Inks and acrylic paints to create the background. Then I stamped and heat embossed with Black Detail Embossing Powder the Tombstone Owl and I threw in a few stamped bats for a good measure (from Tricky Words and Halloween Diamonds Perfectly Clear sets).

I stamped the Tombstone Owl again onto white card with Memento Tuxedo Black ink and coloured it in with Distress Markers. Then I fussy cut parts of the stamp and added them to the card over the Black Thin 3D Foam Squares.


The frame was die cut from a black 3D Foam Creative Sheet using Sizzix Victorian Cameo die set and fully covered with Maroon Micro Glitter

I also couldn't pass on the opportunity of some Frantage treatment using the encrusted jewel technique with my all time favourite mixtures: Aged Wine Embossing Enamel and Copper Mix Lux. Oooh, I love that lush sparkle!


To finish my tag I added a May Arts ribbon, a Bat Doodle and a Halloween sentiment.

I hope you enjoyed my today's offering! Thanks so much for stopping by and for all your lovely comments!

Big crafty hugs


Follow on Bloglovin
♥ Follow Me On Bloglovin'
Read More

Friday 28 March 2014

Life Is Art Tag


Hello everyone! Today over at Scrapbook Adhesives by 3L's blog I'm sharing a tutorial for this mixed media wooden tag:


If you have a spare moment, I'd love it if you visited the blog to see my tutorial :).

To tempt you a bit more, here the list of the yummy supplies I used:
Thin 3D Foam Squares - Mix Black

DODZ™ - 3D

Other supplies:

Stamps (all Stampendous) - Life Is Art, Jumbo Moray Dahlia, Asian Umbrella, Jumbo Spider Mum
Micro Glitters (Stampendous) - Black, Ice Blue, Pink
Inks (Tsukineko Imagine Crafts) - Radiant Neon Electric Pink, Timber Black StazOn
Other media: Gelatos® (Design Memory Craft), Pearl Paint Dabber and Liquid Pearls (Ranger Ink)
Ribbon - May Arts
Creative Canvas Tag - Cosmo Cricket


A short post from me today but I hope you'll enjoy this little offering.

Have a wonderful weekend!

Big crafty hugs


Follow on Bloglovin
♥ Follow Me On Bloglovin'

Challenges for this tag:
Rhedd and Rosie's Challenge Blog #29 - Trees/Wood
Read More

Friday 7 March 2014

Colour Play Party With Stampendous and Faber-Castell Blog Hop


Happy Friday everyone! Today is a very special day - it's a big blog hop fun - colour play party - amazing inspiration - lots of prizes to win - almost the weekend day!

We've been playing this week with the talented folks from Faber-Castell, having lots of fun with colour and stamps. If you haven't seen the projects shared this week yet, I encourage you to have a look - the inspiration shared has been amazing! 

As my offering for today I'm sharing a little tag made with the new cool and funky Stack Art kits. The kits come in sets of kraftboard die cut shapes & sentiment sheets, complimenting stamp sets with their own stamping handle and new Fran-tage kits. These are perfect for beginners, seasoned Krafters or for crops away. You'll have there all you need to complete several amazing projects. The Kraftboard lends itself well to being covered with patterned papers, Fran-tage sparklies or altered with all kinds of creative media :).


To create the background I first covered the kraftboard tag shape (Regal Bird kit) with Adhesive Sheets and adhered scraps of old papers and tissue tape. Then I dry brushed a light coat of Gesso and next I added sections of strokes with the Pastel Crayons and blended them with a baby wipe. I added some background stamping with Black Archival and Teal Blue StazOn using Royal Heart set, NK Studio Grunge and Wired stamps.

The little birdie's body was covered with scrapbook paper and sanded along the edges. The crown and the wing are heat embossed with Chunky White Embossing Enamel. To adhere I used Adhesive Sheet and Thin Black 3D Foam Squares.

The words are a mixture of scrapbook paper and the Regal Bird kraftboard set. I added some final touches with white and black pens, Liquid Pearls and May Arts ribbon.


Here's the list of the peeps playing in this blog hop:
Asia King (yours truly!)

Thank you for visiting and happy hopping!

Big crafty hugs


Follow on Bloglovin
♥ Follow Me On Bloglovin'

Challenges for this tag:
Simon Says Stamp Wednesday Challenge - Tag It
Read More

Saturday 28 September 2013

Autumn is a Second Spring....


... when every leaf is a flower... I couldn't resist opening this post with this beautiful sentence from Albert Camus.

Happy Saturday everyone!

Thank you so much for popping in today. Just wanted to let you know that I have a tag tutorial over at the Scrapbook Adhesives by 3L today :). It would be lovely if you had a moment to hop over there to have a look.

And as always, I would love to know what you think!

Big crafty hugs


Follow on Bloglovin
♥ Follow Me On Bloglovin'

Read More

Saturday 21 September 2013

Autumnal Shades Framed and DIY sparkly acorns


Happy Saturday everybody! 

First, I'd like to say my biggest 'thank you' to everyone who commented on my last post with the happy news about joining the Design Team for the Scrapbook Adhesives by 3L :). Thank you, thank you, thank you!

I hope you've had a good week so far and are ready to do some resting/crafting/cooking/ cleaning* (delete as required). 

My week has been extremely busy. It started with a tornado hitting my craft room, when I started my big reorganising project lol, then I had some late nights working, too.  But I did manage to do some crafting in between my errands. Now I am ready to come back to my tornado struck room and hopefully finish getting it back to a usable state lol. I will share some pictures soon :P.


Today I would like to show you my first autumnal project of the year. One good thing about the end of summer is... the beginning of autumn (or fall as our American friends call it). I simply adore the reds, yellows, browns sunk in the late summer sun, the smoky scent in the air, conkers and acorns falling under my feet... Autumn is one of the most beautiful nature's spectacles... and that's what inspired my project.

This is a 3d tag framed with an upcycled foam protective casing and it's filled to brims with Stampendoulicious goodness. If you have an autumnal project to share, be sure to link it up to our current monthly challenge 'Fall Fun'!

Below, just a few key details but you can read all about my tag and see the step-by-step photos on the Stampendous blog today - I would love it if you visited my post  :)


The supplies I used for my tag are:

Stamps: Perfectly Clear Trees and LeavesHalloween Charms,  Santos AngelElegant Borders and cling Jumbo Leaves


Adhesive: DODZ™ – 3D and E-Z Runner®
 from Scrapbook Adhesives by 3L, 

Ribbon May Arts


Can you see those cute little bead acorns in the photo below? You can view the steps how I made them here.  


Ok, that's all from me for now - I'm off to my craft room to tackle the impossible lol :). What are your plans for this weekend? I would love to know!


Thanks for popping in today and for letting me know you've been. You know how much I love reading your lovely comments!

Big crafty hugs


Follow on Bloglovin
♥ Follow Me On Bloglovin'

Challenges for this project:
Country View Crafts #7 - Layers
Tando Creative September - Let's Leaf It
Vintage Stamping Challenges #12 - Anything from your garden
Crafty Ribbons Challenge #62 - Anything goes with a ribbon
Divas by Design - Anything goes


Read More

Friday 2 August 2013

Stampendous and Dreamweaver fun and blog hop


Hello there and welcome to our big inspirational finale! Are you enjoying our Dreamy Stampendoulicious inspiration week so far? 

Personally, I'm lovin' it! I've been drooling over all the beautiful projects prepared by both teams - be sure to check them all out, if you haven't yet. 


Just hop over to the Stampendous blog and follow the links for each day. And if you leave some love along the way you'll get a chance to win some great prizes (NB. you need a US shipping address to be able to win).


What could you win? Two prize packages will be given away for the comments left on posts Monday-Thursday, July 29th - August 1st, and one prize will be given away for comments left on the hop day, Friday, August 2nd (today - YAY!). Winners will be selected randomly and announced Thursday, August 8th. 


Prize package includes: Stampendous Surfer and Sandcastle Kiddos, Dreamweaver Hot Air Balloon, Ice Cream Cones, Summer, Mosaic Swirls, Bird Words, and Sandcastle stencils.

So here's what I prepared for our Big Blog Hop Finale - a juicy Summer sizzler :). 


And here are the steps. To have a closer look at the supplies I used, just click on the product icons at the bottom of the post.


1. Ink up a tag with your chosen distress inks using wrinkle free distress technique.


2. Ink up the Wine Labels background stamp with Picket Fence (white) Distress Stain. 


3. Stamp directly onto the tag. 


4. Spread Translucent Embossing Paste over the 'Summer' stencil. 


5. Sprinkle the Micro Glitters over the wet paste. Carefully remove the stencil and allow to dry. Repeat the stencilling process in other areas of the tag.


6. Outline the glittered letters with a black pen.


7. Stamp the Grape Label onto patterned paper. Colour with your favourite medium (I used Distress Markers). Trim the image and distress the edges.


8. Embellish the corners using encrusted jewel technique and your favourite Encrusted Jewel Kit. I used the lush Purple one :). Add various embellishments, die cuts (I'm using Marianne's Design butterfly die) and flowers to complete your project.


Now, hold on tight as we've got quite a ride lined up for you! Grab yourself a cuppa, make yourself comfy and enjoy the hop! :)

Asia King (that's me!)

Did you enjoy this juicy summer sizzler from me? If the answer is 'yes' then why don't you click the 'follow' button below (or above lol) so you don't miss future inspiration from my Creative Spell!


Have beautiful weekend and thank you so much for your lovely comments!


Big hugs


Follow on Bloglovin
♥ Follow Me On Bloglovin' 

Challenges for this project:
Szuflada - Kolory lata + kwiaty
Our Creative Corner - Words, words, words
Lemonade Challenge #56 - We enjoy the Summer
Marianne's Design Divas - Layer it up
Live & Love Crafts #14 - Warm or Cool Colours
Mixed Media Place - How you use 'embossing'
Simon Says Monday Challenge - Ode to Sunshine
Read More

Saturday 18 May 2013

Teatime Reflections - quintessentially English layout


Re-edited: I am so super excited to say that my layout was voted as one of the Top Picks at the Simon Says Stamp & Show challenge! Yay!!!

Yay again - this time I'm cheering for the Top 3 award at the Our Creative Corner Challenge! So happy!!!

Hello Crafty Friends!

This week in Stampendous world we're all about teapots. You can check some truly gorgeous inspiration projects on the blog here.

When I first saw these cuuuuute teapot stamps I squealed with joy. I adore vintage teapots and tea cups, all the fine china designs which make the experience of 'cream tea' so quintessentially English... Whether it's the Afternoon Tea at the Savoy, cream tea at Bettys Tea Rooms or simply a girls' afternoon in in your own garden, the whole experience has got something really magical about it...

I just 'happen' to have a small collection of vintage teapots and tea cups which became the theme behind this project. And I also happen to have beautiful teatime themed napkins, which I just HAD to include. Mix it all with a touch of Fran-tage... pure delight my friends! So today I'd like to share my Teatime Reflections layout.


I was recently inspired by beautiful work you can see on Rachelle's blog. Rachelle's layouts often feature beautifully distressed layers and I simply fell in love with this look. So my scrapbook page has lots of layers, distressing shabby chic-ing, Fran-taging and of course - stamping! 


Starting from the bunting in the top corner we have Royal and Queen Teapots. Below, a journaling card with  Kettle On sentiment and some elements from Crafty Emblies altered with Shabby White, Vintage Lilac and Aged Wine enamels.


Here I have a secret journaling tag die cut from a souvenir postcard I kept from our stay in the charming Hotel Estherea in Amsterdam. On the reverse I sponged some Rusty Hinge distress ink, stamped the King Teapot in the same ink, added a stamped label from the Luggage Labels set and spritzed some coffee for a mottled effect.


The sentiment quote (my all time favourite) is computer generated. You can find some lovely teatime quotes here. Or you can have a look at the beautiful Stampendous WordArt digital downloads here.


Above, metal ornate corners from Happy Daze shop were embossed with Shabby White enamel. Below, the gold embossed flower Ruffled Bloom was decorated with gems from Create & Craft and Champagne & Lavender glass glitters. On both photos you can also see some of my napkin art.


If you'd like to see the full tutorial for this scrapbook page, click on the picture below.


Thank you so much for popping in today and for all your heart-warming comments. I really appreciate them all!

Enjoy the rest of the weekend.

Big hugs


Challenges for this project:
Country View Crafts #3 - How does your garden grow
Live and Love Crafts #11 - 50 shades of Lilac
Simon Says Stamp & Show - A little paper
Simon Says Stamp - Flower Power
Our Creative Corner #1 - Anything Goes
Read More
.
Related Posts Plugin for WordPress, Blogger... All content, except where stated (including text, photographs and designs), is copyright of Asia King (Creative Spell Designs). I share my artwork for personal inspiration only. I don’t mind if you copy any of my designs for your own personal use, providing you give me credit by referring to my blog. You may not however copy my designs and photographs for contests and publications entries (online or otherwise) or to sell in either handmade or printed form. You may not copy my designs and photographs for advertising & commercial purposes, without my prior permission. Thank you for your understanding.
MyFreeCopyright.com Registered & Protected

Craft Blogs - BlogCatalog Blog Directory blog button flower Photobucket Crafty Blogs

Let's Tweet!

Powered by Blogger.

© 2011 Under a creative spell, AllRightsReserved.

Designed by ScreenWritersArena