

Hi all, Linda back again this week with another Saturday StepXStep and wishing all my American friends a happy Memorial Day. I wanted to so something patriotic for this important holiday so I pulled out my Artistic Outpost Hero set. I was going to use the soldier image but started looking at the collage stamp with Rosie the Riveter on it and decided to go in a more feminine direction. While she might not have been an enlisted person, the "Rosies" of the WWII era made an important contribution to the war effort and I thought it would be great to recognize that this Memorial Day.

I started thinking about how I could bring in some red and white strips to signify our American flag and decided to stay with the feminine feel by making my stripes a flower. I cut three flowers out of crinoline with my Tattered Florals die and dyed them with Barn Door distress stain. If I am dying a large batch of crinoline flowers, I usually make up a dye batch with reinkers, but to dye just a couple of flower layers, pulling out the distress stain is quick and easy. I dried my flower layers with my heat tool.

The left over ink also got dried with my heat tool so I misted it to rehydrate the ink and then blotted my tag into it. I dried the first layer and blotted it again. I ended up doing that three times to create the base layer of my tag.

I wanted the flag stamp on the tag but was in a frame and had other images and a sentiment that I didn't want, so I masked off those areas with masking tape before I inked up my stamp.

The stamp was inked with cobalt archival ink.

The tape was peeled off before stamping.

Stars were added using the Tim Holtz Stars Layering Stencil and white Wendy Vecchi embossing paste. I applied the embossing paste with my finger - I find it gives me much better control over where the paste is applied than using a palette knife.

I added a bit of bling by applying distress glitter directly to the wet embossing paste.

Carrying on with the flag look, I cut banners from red kraft core and white card stock. The HERO was stamped in Cobalt archival, snipped apart and the edges were inked with Vintage Photo. I wanted some sort of blue panel to mount my stars on so I cut a Tattered Banner from blue kraft core, sanded and inked it before adhering the stars with Multi Medium Matte.

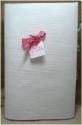
To continue with the feminine theme, I gave Rosie a topper cut with the Vintage Lace die and a pretty red crinkle ribbon bow held on with a Gem Clip and topped with another Mirrored Star.

The tag was finished off with a red and white crinoline flower, topped with a white distress glittered star and a blue star button.


Thanks for hanging in with me for this StepXStep. I wish you all a wonderful weekend wherever you are and a happy and safe holiday weekend to my American friends!

These products are available at The Funkie Junkie Boutique, where most name brand products are always 20% below MSRP!
 |  |  |  |  |
 |  |  |  |  |
 |  |  |  |  |
 |  |  |  |  |
 |


